Manual IBANC Software - Version 2.0.24
IBANC software is a software product that allows you to create credit transfer and direct debit batches easily and flexibly that conform to the new SEPA guidelines. You can import your data easily from Excel and CSV files. The comprehensive mandate management system of IBANC enables you to deliver direct debit batches to the bank without errors and frees you from unnecessary costs.
IBANC has many features and helps you to prevent errors when creating batches. The rules concerning direct debits have become more complex than you were used to with the introduction of SEPA. Therefore, it is important that you get familiar with these new rules. Much information can be found on the website of the Dutch Payments Assocation:
Another valuable resource is the website of the European Payments Council (EPC):
For other questions regarding SEPA, please contact your own bank. They should be able to give you more information.
This manual shows all the features of IBANC. The manual is available online and as a PDF document:
1 IBANC Software - Introduction
2 Getting started
2.1 License Activation
2.2 Enter your information
2.3 The first direct debit
2.4 The next direct debit
2.5 The first payment
3 IBANC Configuration
3.1 Direct Debit Contracts with Banks
3.2 Own Bank Accounts
3.3 Settings
4 The address book
4.1 Adding New Bank Accounts
4.2 Importing and Exporting Bank Accounts
4.3 Conversion to IBAN and BIC
4.4 Mandates
4.5 Groups
5 Creating Direct Debit Batches
5.1 Import Transactions from Excel of CSV Files
5.2 Import Transactions from Other Files
5.3 Add Groups
5.4 Adding Accounts to a Group
5.5 Duplicate Batch
5.6 Export to SEPA XML
5.7 Generate Mandates Automatically
5.8 Fill in Automatically
5.9 Export
5.10 Printing
6 Creating Credit Transfer Batches
7 System Requirements
1 IBANC Software - Introduction
IBANC software is a software package that allows you to create European credit transfer and direct debit batches easily. IBANC has been built around few basic principles:
- Prevent erroneous data in transactions (very import when using direct debit!)
- Easily import data from various sources
- Flexible management of your relations, including group managmenet
- Keep track of mandates conforming the new SEPA guidelines
All information regarding your relaties are recorded in your address book. This information is used to check if transactions contain the correct and necessary information. The address book also contains the mandate information. By making clever use of this address book, you can create batches quickly and easily. For example, it is possible to import a list of IBANs and amounts only in IBANC. Subsequently, the address book can be used to fill in the remainder of the batch automatically.
2 Getting started
2.1 License Activation
After you placed your order, you have received an email with instructions to download IBANC. If you run the downloaded file (Windows) then IBANC will be installed.
You can start IBANC by double clicking the IBANC icon on your desktop. IBANC can also be found in the start menu. If you use Windows 8 or higher, you can type “IBANC” in the start screen to find IBANC.
The first time you start IBANC you will be asked to enter your registration key. You have received this key by email. If you encounter any problems when registering IBANC, your firewall settings might block IBANC from making connections. Change your firewall settings to allow IBANC to make connections or ask your system administrator to do so.
2.2 Enter your information
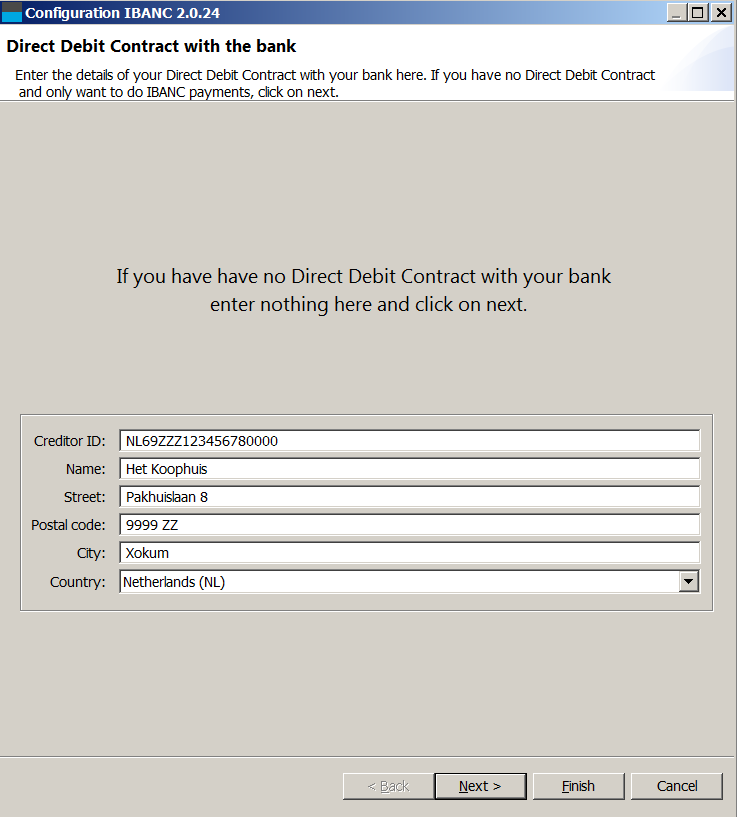
If you entered your registration key correctly you will be asked to fill in your bank account information. First, you will be asked to fill in the details of your direct debit contract with your bank. If you do not want to use the direct debit functionality of IBANC, click “Next” to proceed. In Figure 1 you can find an example what the screen looks like.
The creditor ID is provided by your bank. For example, Dutch creditor IDs start with “NL”, followed by two numbers, followed by “ZZZ”, followed by a sequence of numbers. Warning! This is not your IBAN!
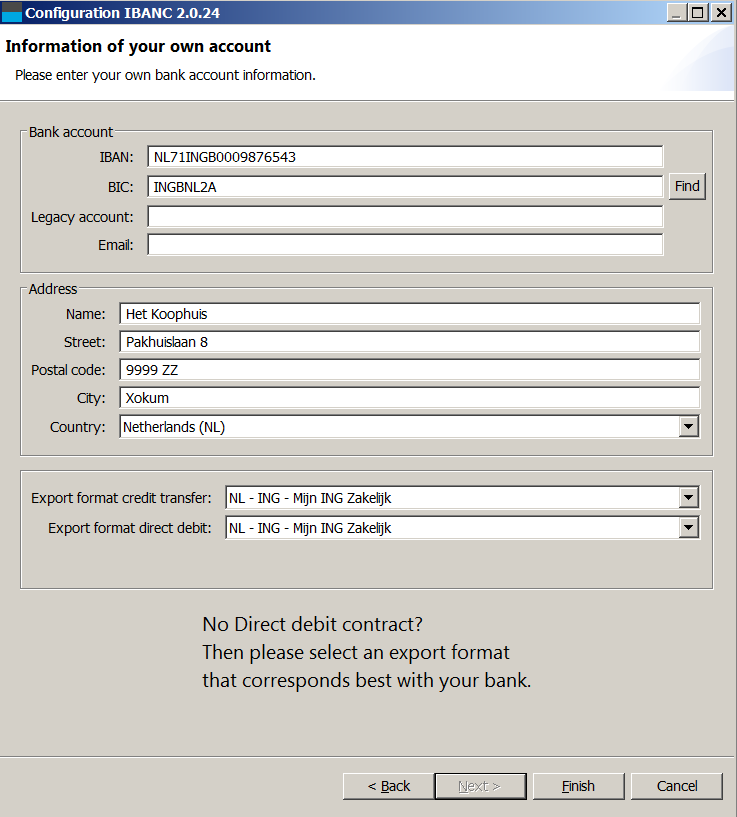
If you clicked on “Next” you can fill in your own bank account details. If you filled in the address information in the previous screen this information will be filled in automatically. You can change this if needed, of course. Figure 2 show an example with the bank account details filled in.
Once your done filling in your information, click on “Finish”. The main screen of IBANC Software will appear now.
2.3 The first direct debit
You will now create your first direct debit transaction. This will be done completely by hand, so you can see which information is required to perform a direct debit correctly.
Click on the button “New” in the direct debit panel (left part). This will create a new, empty direct debit batch. This batch will be opened immediately.
You can enter a description for the batch. This description will not be sent to your bank and you can choose any description you desire.
At the header “Bank account” you select your own bank account. If you have configured only one bank account, thie bank account will be selected automatically. If you have multiple bank accounts, select the desired bank account by clicking the looking glass next to the IBAN field.
You have now selected your own bank account. Beware that all fields have been filled in. If this is not the case, please enter all information first. This can be done through the menu “File”, “Own bank accounts” in the main window.
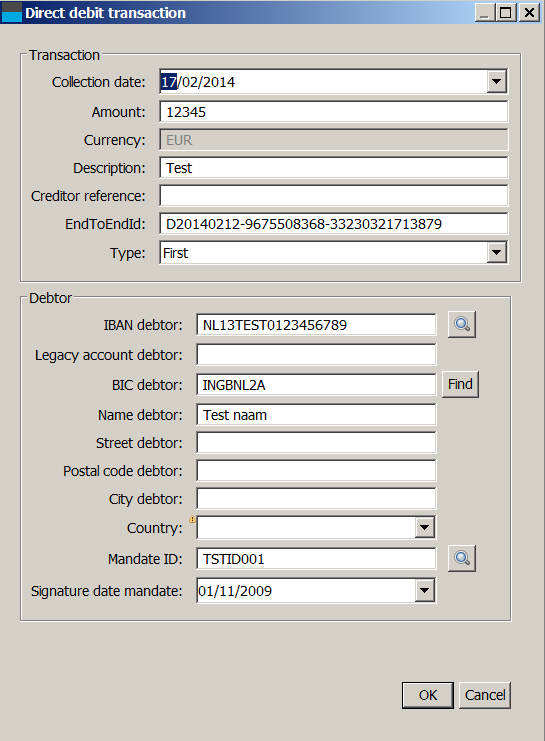
Above the list of transactions (which is empty now), click on “New”. Fill in the following information in the form that pops up:
- Collection date: Fill in the date on which the transaction should take place. The default value is 5 days in the future.
- Amount: Fill in the amount that you want to collect. For example, fill in “123,45”.
- Description: Fill in the description for the transaction. For example, fill in “Test” in. Note that this field is not required.
- Creditor reference: You can enter a creditor reference here. This should be a Currence (Dutch banks) of ISO creditor reference. We recommend to leave this field empty, unless you are certain that you need this. If this field is filled in, the description will not be used!
- Type: Select “First”. If you collect for the first time in a series of colletions using a particular mandate ID, you must selected “First”.
- IBAN debtor: Fill in (for testing) “NL13TEST0123456789”.
- BIC debtor: Fill in (for testing) “INGBNL2A”. In general, you do not need to fill in the BIC for Dutch bank accounts, but in this example, the unknown bank code TEST is used.
- Naam debtor: Fill in “Test naam” in.
- Country debtor: You can select the country of the debtor here. If you do not select a country, IBANC will select a country based on the first two characters of the IBAN.
- Mandate ID: Fill in “TESTID001”. You can create your own mandate IDs, but each mandate should have a unique mandate ID.
- Signature date mandate: Please fill in the date on which the mandate has been signed. For existing direct debit contrains (pre-SEPA) you must use 1 November 2009.
Your transaction should look similar to Figure 3.
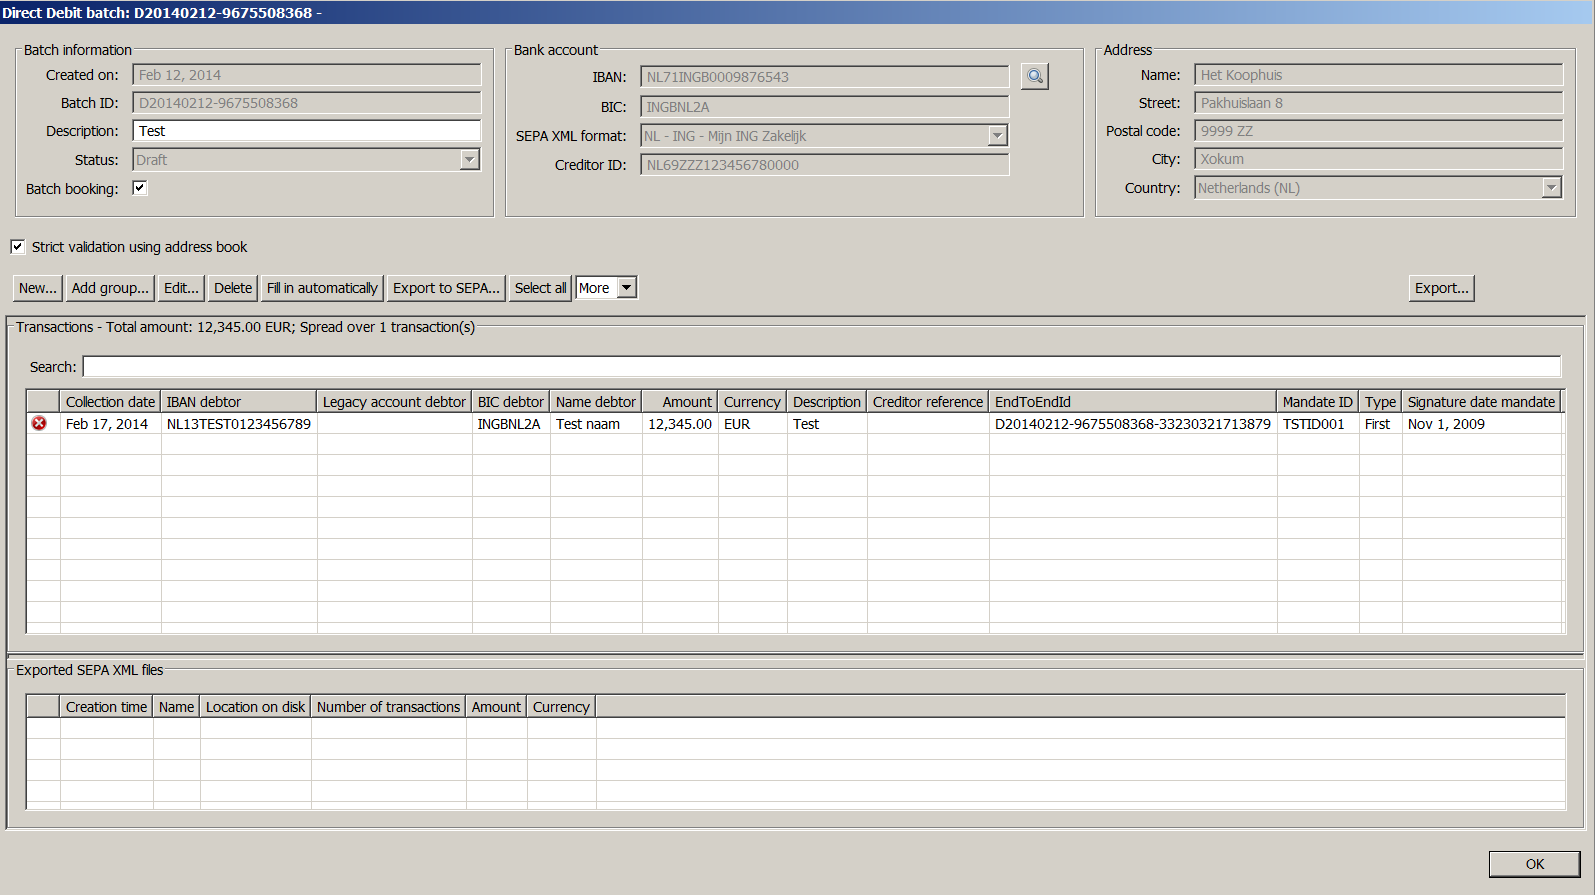
Click “Ok”. The new transaction will appear in the transaction list. In front of the transaction, you can see a cross mark that indicates that there is a problem with this transaction. By moving your mouse pointer over the cross mark, you can see a description of the problem (it should appear in about a second). In this particular case the problem is that the account is not known in the address book. That is correct. Nothing has been entered in the address book yet. You can import the bank account data easily by selecting the transaction (click once on the transaction). Then, click the button “More” and select the option “Import in address book”. Confirm your selection. If everything went well, a green tick mark should appear in front of the transaction (Figure 4).
Using this procedure you can add as many transaction as you want. To export the batch to the SEPA format, click “Export to SEPA”. Click “Ok” when you see the messages that the batch has been exported successfully. You can now save the SEPA XML file to disk. You should send this file to your bank, for example through their web site. Please consult your bank if you do not know how to send this file to your bank. Warning! Do not send the example file you created here to your bank.
2.4 The next direct debit
If the previous batch is still open, close it by clicking “Ok”. We will now create a new batch with a single transaction that will contain a recurrent direct debit, using the same bank account and mandate as in the previous transaction.
Create a new batch by clicking “New” and create a new transaction by clicking “New”. Fill in an amount, for example “321.45” and a description. Click on the button next to “IBAN debtor” (with the looking glass icon). You can now select a bank account from your address book. You can select an account by clicking on it (Figure 5) and clicking on “Ok” after. Select the same bank account that you used in the previous direct debit transaction (NL13TEST0123456789).
IBANC will find the corresponding mandate that matches with the creditor ID automatically. Click on “Ok”.
Again, a cross mark will appear in front of the transaction. If you move the mouse pointer over the cross mark you can see that the previous transaction used type “First”, but IBANC does not know whether this transaction has been approved or rejected by the bank. Click the button “Fill in automatically”. Using this button you can fix many frequently occurring issues. Anwswer “Yes” to the question that you address book might get updated. Also answer “Yes” to the question if the previous transaction has been processed correctly by your bank. Of course, if you really send a batch to the bank you must be certain that the previous transaction has been processed correctly. After you have confirmed this a green tick mark should appear in front of the transaction. You can now export this batch to a SEPA file by clicking “Export to SEPA”.
Warning! In the case that the first transaction for a mandate has been rejected by the bank, you must send the next transaction with type “Eerst” again. You can do this as follows:
- Open the transaction (double click or select the transaction en click “Edit”.)
- Select type “First”.
- Click “Ok”.
- The type in the transaction does not match the type that has been registered in the address book anymore. You can solve this by importing the transaction in the address book.
- Select the transaction and click “Importeer in adress book” (use the button “More”).
A green tick mark will appear in front of the transaction and you can export the batch to a SEPA file.
Warning! Take care that you become familiar with SEPA mandates. For more information you can consult the website of the Dutch Payments Association Dutch Payments Association. or the European Payments Council. For more information on SEPA mandates, please contact your own bank.
2.5 The first payment
Credit transfers are much easier than direct debits. In principle, you only need an IBAN, a name and an amount. It is advisable to use a description. This description will also appear on the bank statement of the receiving party.
Just as with direct debits you can use the address book to look up bank accounts. To be sure that you have entered the correct information, credit transfers are also validated using the address book. For credit transfers, this is less important than for direct debits and if you like, you can turn off validation by unchecking the tick mark “Strict validation using address book”. If you close the batch and reopen it, strict validation will always be re-enabled.
3 IBANC Configuration
In order to work with IBANC, you must enter the account information of your own bank accounts. If you want to use direct debits, you should also enter the information of your direct debit contract with your bank.
Section 2 describes how you can enter this information when IBANC is started for the first time.
You can always change this information later, or add new direct debit contracts and own bank accounts (you can only use multiple bank accounts in the Business, Ultimate or ING edition).
3.1 Direct Debit Contracts with Banks
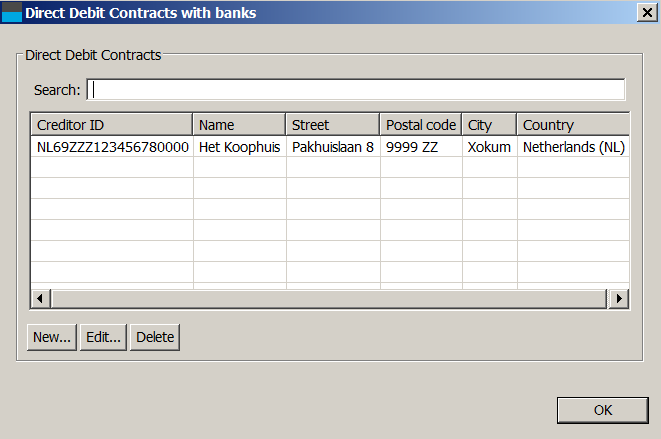
In the menu “File” you can find the option “Direct debit contracts with banks”. Click this option to show your direct debit contracts. You have the following options in the screen (Figure 6):
- New. Use this to create a new contract.
- Edit. Use this to edit an existing contract. Select the contract that you want to edit and click “Edit”.
- Delete. Use this to remove a contract. This will only work if this contract is not linked to any own bank accont.
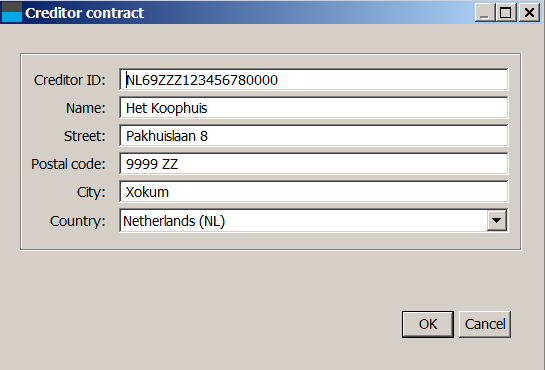
Figure 7 shows what a filled in contract looks like.
The creditor ID is provided to you by your bank. Warning! This is not your IBAN!
3.2 Own Bank Accounts
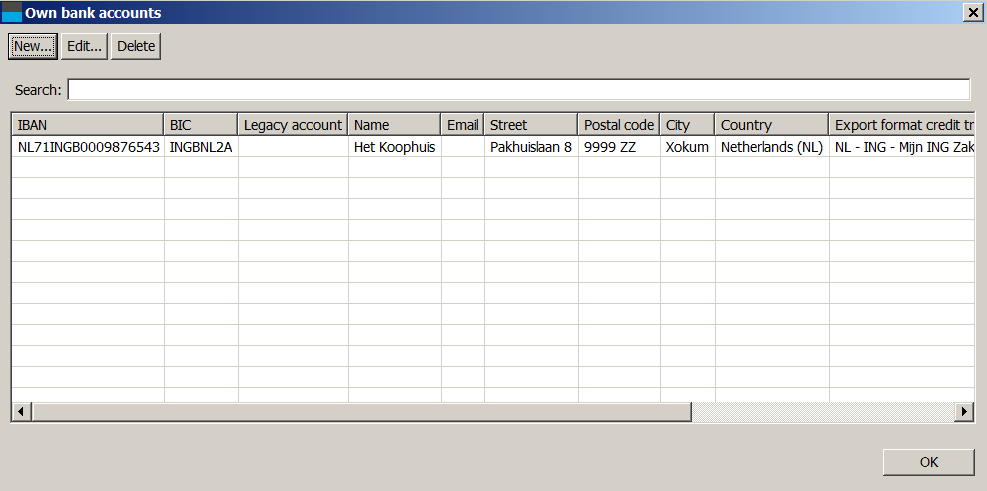
In the menu “File” you can find the option “Own bank accounts”. Click this option to show your own bank accounts. Using this window, you can create, edit and delete own bank accounts. (Figure 8).
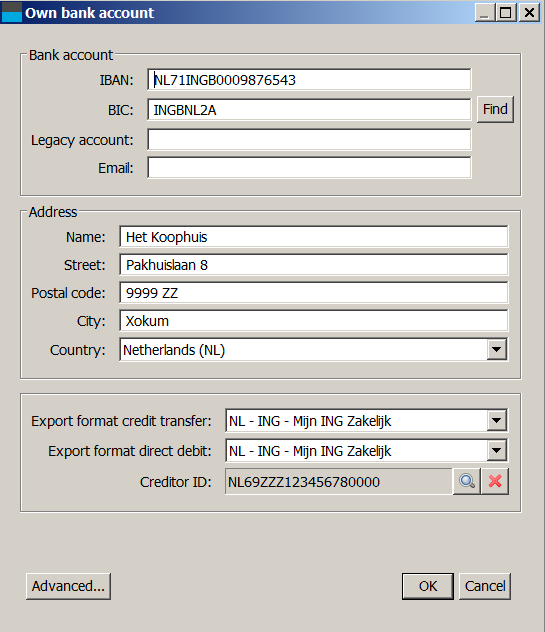
If you add or edit an own bank account, you can fill in the following details (Figure 9):
- IBAN. This is the IBAN of your own bank account.
- BIC. This is a code that indicates your bank. You should be able to find this code on your bank statement. If you cannot find this code, your bank can provide these details.
- Legacy account. This is your old account number. Usually, this is not needed, but it can be used to translate old account numbers to IBAN / BIC.
- Email. You can enter your own email address here.
- Address details. Fill in your address information here.
- Export format credit transfer. Please select the option from the list that best suits your own bank. While SEPA XML is standardised, differences among banks exist. IBANC takes these differences into account.
- Export formaat direct debit. Please select the option from the list that best suits your own bank. While SEPA XML is standardised, differences among banks exist. IBANC takes these differences into account.
- Creditor ID. This field links the bank account to the proper creditor ID. Click on the looking glass icon to select the correct direct debit contract. By clicking the cross mark, you can remove the assocation.
If you have entered your account details correctly, you can click “Ok” to save your changes.
3.3 Settings
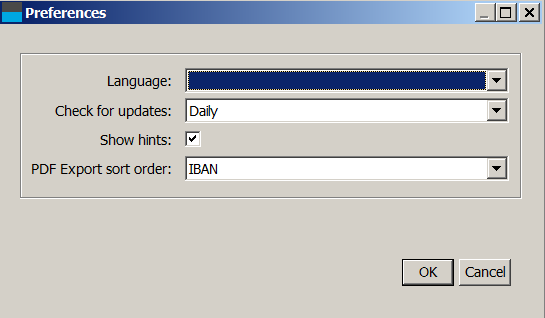
In the menu “File”, you can find the option “Settings”. Click this options to edit settings for IBANC. You can change the following settings (Figure 10):
- Language. Use this to select the language for IBANC. If you change this setting, you must restart IBANC. If this field is empty, the default language of your operating system will be used.
- Check for updates. Use this to set the frequency at which IBANC checks whether there are updates available. This way you will be informed when there is a new version available for you.
- Show hints. If this option is enabled then a balloon with an explanation will appear for some fields. If you are an experienced user, you may want to disable this feature.
4 The address book
In the address book you can keep track of bank accounts of your contacts. IBANC uses the addressbook to validate transactions which is especially important for direct debit.
A frequently asked question is: Is it possible to have to same bank account multiple times in the address book? The answer is no. IBANC considers a bank account as a unique entity that should only be recorded once. If you want to distinguish between different transactions using the same bank account, you should use the description field for this. For example, you can use the description “Membership John” in one transaction, and “Membership Mary” in another.
In the address book of IBANC u can manage bank accounts and direct debit mandates. You can also add bank accounts to groups when editing a bank account.
4.1 Adding New Bank Accounts
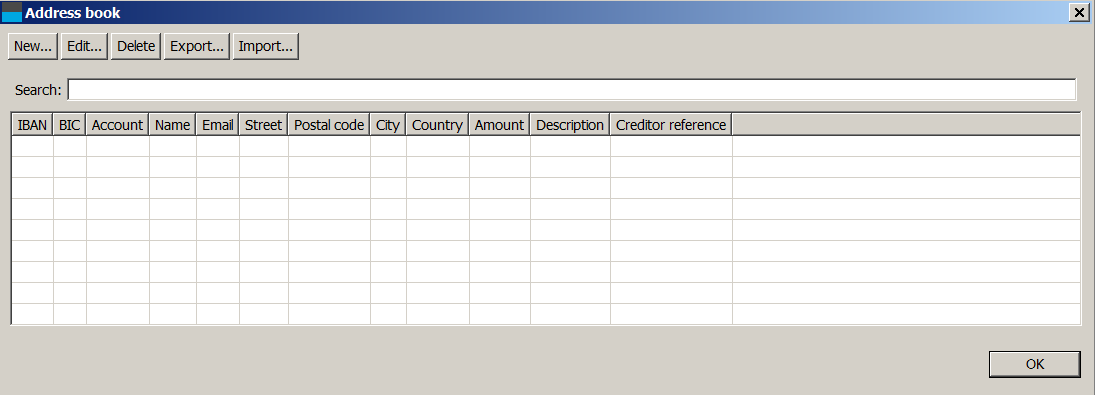
You can open the address book from the “File” menu using the option “Address Book”. The address book looks as shown (empty) in Figure 11.
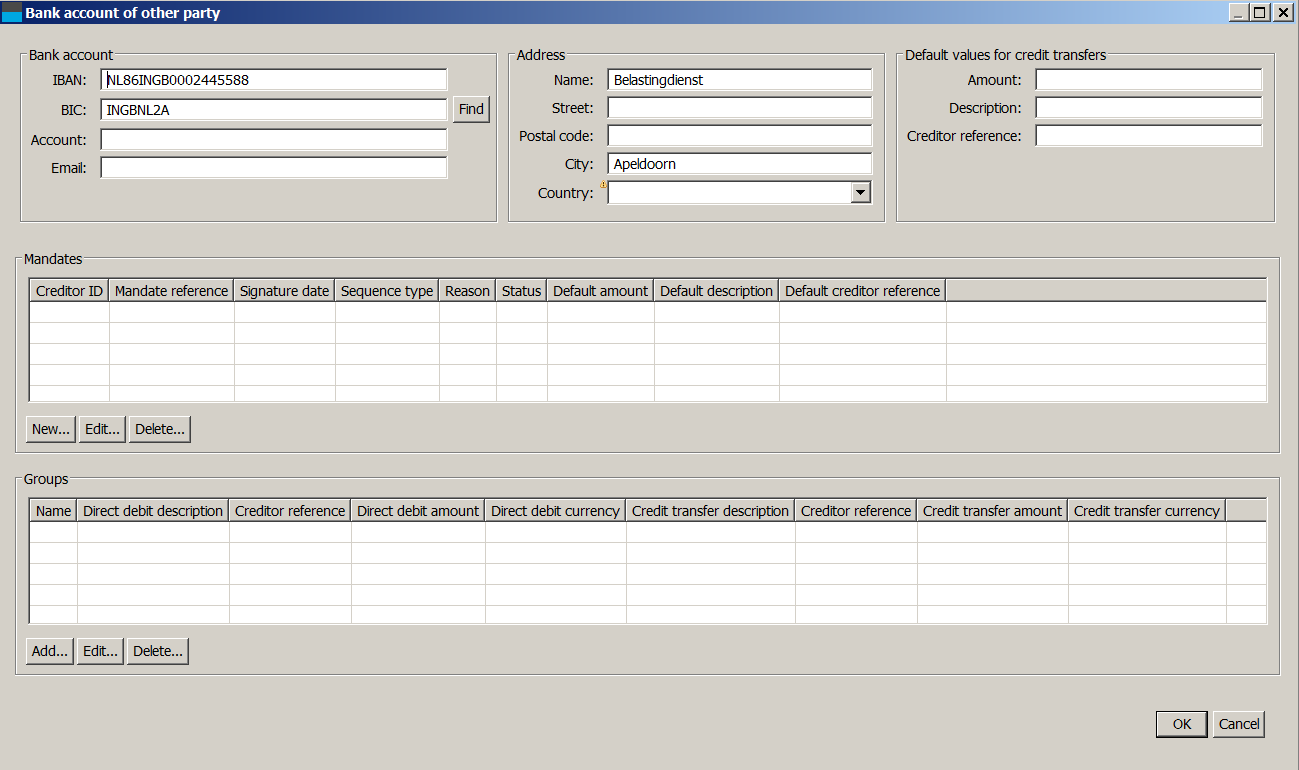
By clicking “New”, you can add a new bank account. You can find an example in which the IBAN en BIC are filled in in Figure 12.
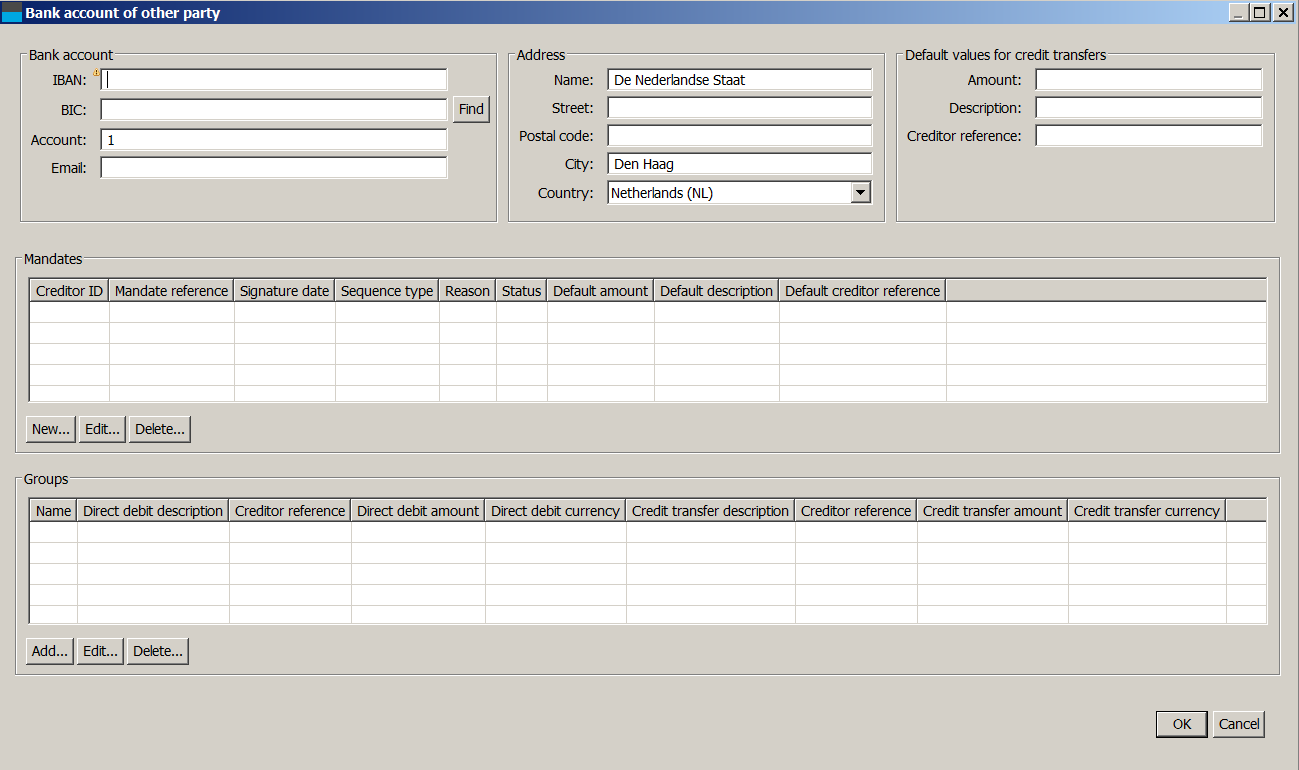
Figure 13 shows an example in which only the legacy account number is filled in, but the IBAN and BIC are not filled in. Warning! In this situation, you should fill in the country yourself, because IBANC cannot guess it using the IBAN. If you want to find the IBAN and BIC for Dutch bank accounts, you can do this in two ways using the IBAN BIC service):
- By hand, per account number (klik hier)
- For your entire address book (Dutch accounts) (Click “Export to IBAN BIC Service”). This option is explained in more detail in Section 4.3.
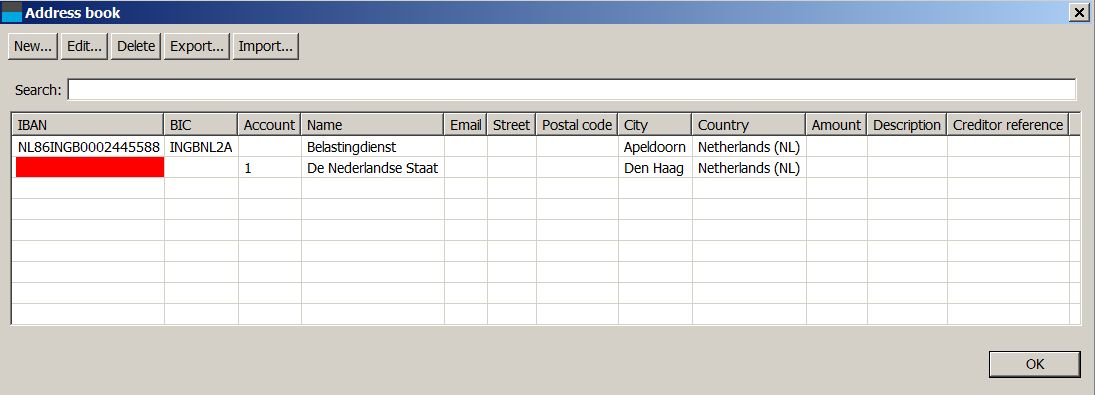
After saving the last bank account by clicking “Ok” your address book should look like Figure 14. You can see that if the IBAN is not filled in correctly, the field is marked yellow.
4.2 Importing and Exporting Bank Accounts
All bank accounts in the address book can be imported from Excel and CSV files. Creating an import profile follows the same principles as creating an import profile for transactions (see Section 5.1). The address book provides the option to update existing bank accounts when importing account data. You can choose to only add new accounts or to update existing accounts. When updating existing accounts, you can choose to ignore empty fields or you can import also empty fields.
4.3 Conversion to IBAN and BIC
For Dutch bank accounts you can perform the conversion to IBAN and BIC quickly and easily. If you click the cutton “Export to IBAN BIC Service” then all bank accounts where the old account number is filled in will be exported to a file. Warning! De filename extension must be “.csv”. You can select the location where you want to save the file yourself. Next, the website of the IBAN BIC service will be opened automatically. On this website, you can register. After registration you can upload the file you just exported. After some time you will receive a message and then you can download a file in which the IBAN and BIC have been added.
Using the button “Import from IBAN BIC Service” you can import this file in IBANC. You will be asked if you want to overwrite existing IBANs and BICs. The IBAN BIC Service is the only reliable source to convert Dutch bank accounts.
4.4 Mandates
If you want to use SEPA direct debit you need to obtain mandates from your debtors. This mandate information must be registered in IBANC because this information is needed in every direct debit transaction that you send to your bank. It is of utmost importance that you are familiar with the regulations concerning SEPA direct debit. For more information you can check the website of the Dutch Payments Association (Click here). Here you can find information about European direct debit and information about the regulations about informing your debtors.
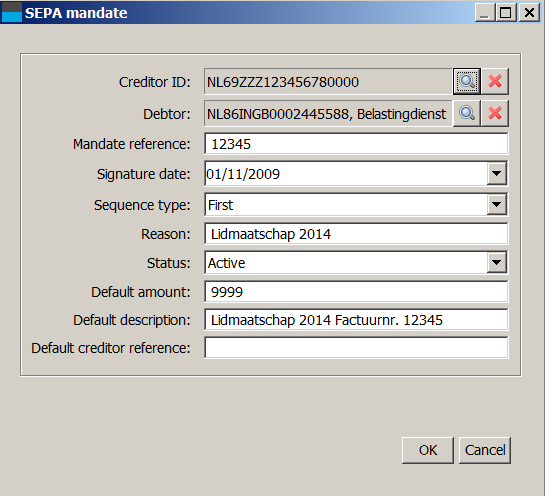
In IBANC you can create a new mandate if you have opened a bank account in your address book by clicking the “New” button below the list of mandates. (Figure 13). Next, you can fill in the mandate details. Figure 15 shows an example of a filled in mandate.
You can fill in the following fields.
- Creditor ID. Here you can select a creditor ID from the list of direct debit contracts with banks. If you have only configured one direct debit contract, this will be filled in automatically. You can change it by clicking the looking glass icon.
- Mandate ID. This is a unique identifier that identifies a mandate. You must choose this yourself. Possibilities are, for example, membership number or customer number. If you have multiple mandates per bank account, you can introduce a sequence number or you can use a date in the mandate ID (for example: “1234-2013-01-12”).
- Signature date. This is the date on which the debtor has signed the SEPA direct debit mandate. Warning! For direct debits contracts that have been signed before you started using SEPA direct debit, you must use the date 1 November 2009.
- Sequence type. This is “First”, “Recurrent”, “Final” or “One-off”. When using a recurrent mandate, the first in a series of collections should have the type “First”. After the first collection has been processed correctly, the type should be “Recurrent”. IBANC automatically changes the type from “First” to “Recurrent” after exporting a transaction with type “First”. For one-off direct debits you should use “One-off”. Warning! You can use a mandate ID for a one-off direct debit only once. If you need to to another collection from the same account, you must obtain a new mandate with a different mandate ID.
- Reason. You can fill in a reason for the direct debit here. This field will not be visible on the bank statement of the debtor.
- Status. This field can be set to the following values: Active. This is a mandate that can be used. Most of the time, this status should be selected. Sent First. This is a mandate for which a transaction with sequence type “First” has been exported, but the successful execution of the transaction has not been confirmed. In general, you will never have to set a mandate to this status manually. One-off used. This is a one-off direct debit mandate that has been used in transaction and cannot be used again. These mandates are kept to ensure that these mandate IDs will never be used again. Inactive. This is a mandate that should not be used. These include, for example, mandates that have been ended.
- Active. This is a mandate that can be used. Most of the time, this status should be selected.
- Sent First. This is a mandate for which a transaction with sequence type “First” has been exported, but the successful execution of the transaction has not been confirmed. In general, you will never have to set a mandate to this status manually.
- One-off used. This is a one-off direct debit mandate that has been used in transaction and cannot be used again. These mandates are kept to ensure that these mandate IDs will never be used again.
- Inactive. This is a mandate that should not be used. These include, for example, mandates that have been ended.
- Default amount. This is the default amount that will be filled in if a mandate is selected. If an amount has already been filled in in a transaction (for example imported from Excel), it will not be overwritten.
- Default description. This is the default description that will be filled in if a mandate is selected. An existing description will not be overwritten.
- Default creditor reference. this is the default creditor reference that will be filled in if a mandate is selcted. An existing creditor reference will not be overwritten. Warning! Only use this field if you understand how Currence (Dutch) or ISO creditor references work.
4.5 Groups
By making use of groups you can quickly add multiple bankaccounts to a batch. If you edit a bank account in the address book you can view de groups of which the account is a member below the list of mandates. It is also possible to a bank account multiple times to the same group. This way, you can easily create a direct debit batch if there are multiple members of a family from which you need to collect. For each person you add the same bank account to the group, using a different description and different amount (if needed).
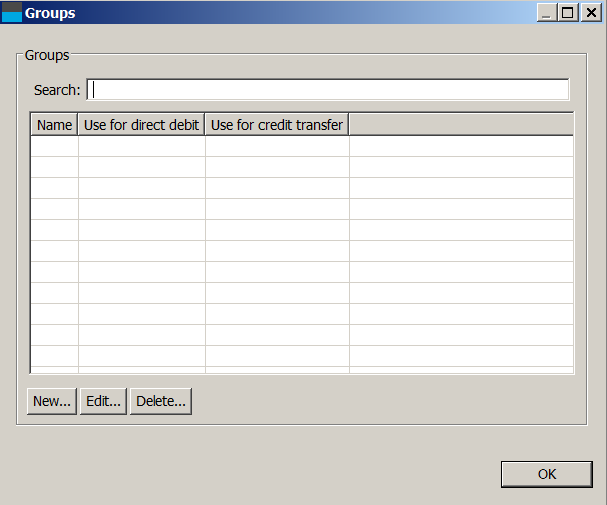
From the main window you can find the option “Groups” in the “File” menu. If you select this option, the group window will appear (Figure 16).
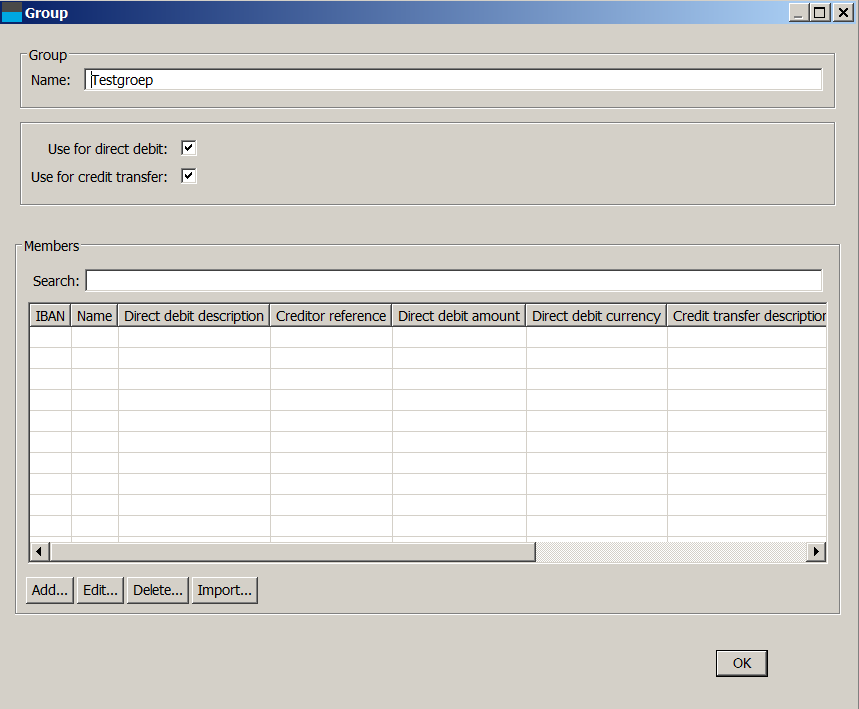
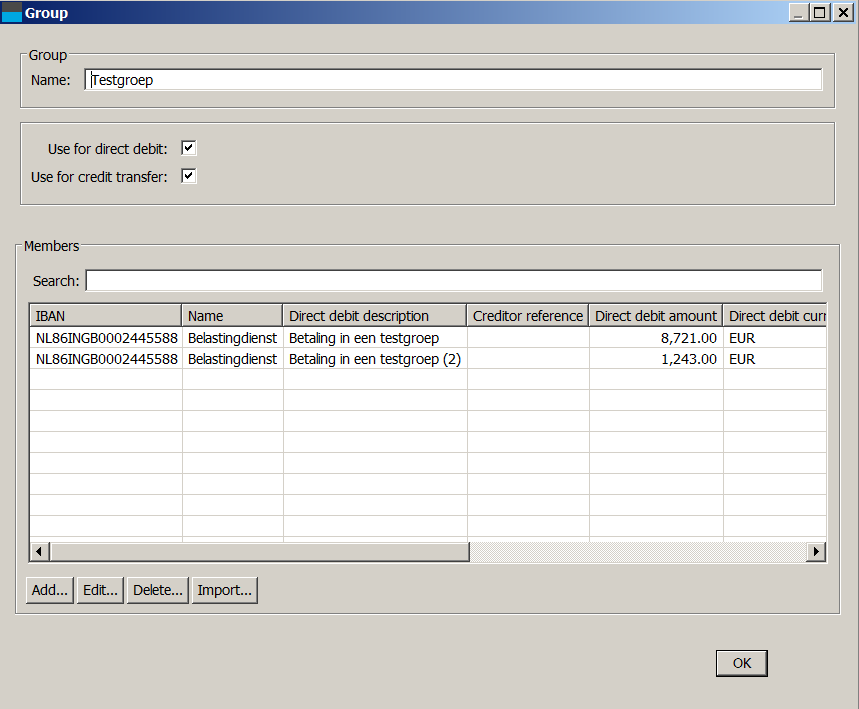
By clicking “New” you can create a new group. You can also edit existing groups using “Edit”. If you create a new group, a window will appear in which you can edit the group details (Figuur 17).
Assign a new name to the group. This name must be unique. You can select whether the group should be available for direct debit batches and/or credit transfer batches. For example, if you remove the tick mark for credit transfer you cannot select this group in a credit transfer batch.
Below the list of group members you can find the buttons you can use to add, edit and remove groups. You can also import groups from Excel and CSV files.
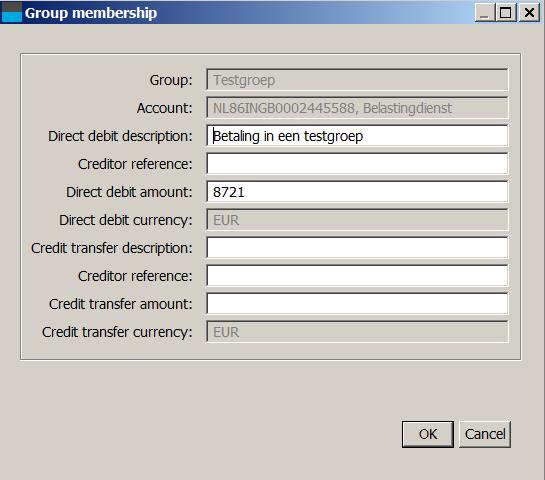
If you add a member to the group (by clicking “Add”), select the account you want to add. Next, a window will appear in which you can set the default values for transactions for this specific group membership. (Figure 18).
You can fill in the following fields that will be used when you add this group to a direct debit batch or credit transfer batch, respectively:
- Direct debit description
- Direct debit creditor reference (only use this if you understand Currence or ISO creditor references)
- Direct debit amount (EUR)
- Credit transfer description
- Credit transfer creditor reference (only use this if you understand Currence or ISO creditor references)
- Credit transfer amount (EUR)
Of course, these fields are not mandatory. If they are not filled in, the fields in the transactions will also not be left empty if the group is added to a batch. If you add the group in a batch, you can provide an amount for the entire group. If you use this, this amount will be used for the entire group and any amount defined in the group memberships will be ignored (Figure 18).
It is possible to put an account multiple times in the same group. This can be convenient when you want the same bank account for members of the same family, for example (Figure 19).
Import groups
You can also import a list of bank accounts at once into a grup. The window that appears looks the same as the window that is used to import bank accounts into the address book. You can define the import profile if needed. If you import these accounts into a group, IBANC will import bank accounts that are not in the address book yet. Existing bank accounts will not be changed. In both cases, the bank account will be added to the group.
5 Creating Direct Debit Batches
With IBANC you can create direct debit batches flexibly. You can do this using one of the following methods:
- Add transactions by hand (see Section 2).
- Import transactions from Excel en CSV files.
- Import Clieop and existing SEPA XML files (Business edition and higher).
- Importert BTL91 files (Ultimate editie).
- Duplicate an existing batch.
- Add groups to a batch.
Adding transactions by hand is explained in detail in Section 2.
5.1 Import Transactions from Excel of CSV Files
With IBANC you can easily import data from Excel of CSV files. These files do not need to have a fixed format, because you can define which columns you want to use in IBANC using so called import profiles. Using import profiles you can define which column in your Excel sheet should be used for the various fields in IBANC.
To get you started you can download example Excel files using the link below:
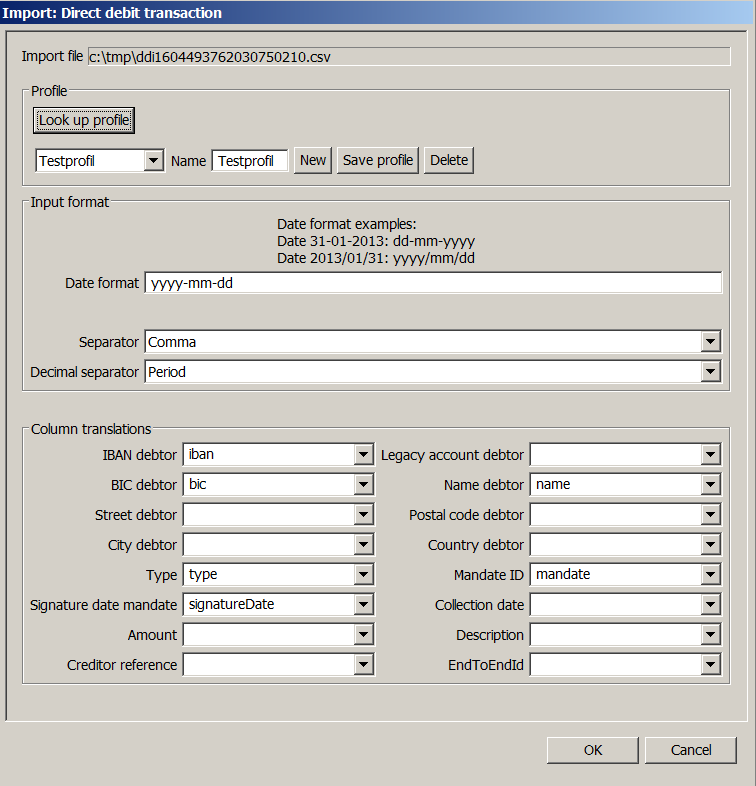
To import an Excel or CSV file click “Import” in the window for direct debits (left part). Select the Excel or CSV file you want to import. A window will appear where you can create (or select) the import profile. If you have saved import profiles before then IBANC will try to find a profile that matches best with the file you want to import. You can find an example of this window in Figure 20.
You can select the columns from the file you want to export by clicking on the arrows next to the fields. A drop down menu appears from which you can select the column you want to import. In the example you can see that the column “iban” from the worksheet will be linked to the field “IBAN debtor” in IBANC. You do not need to create a mapping for all fields. If all bank accounts and mandates have been imported in the address book before, then only importing IBANs and amounts may be sufficient. All other information can be copied from the address book then.
It is also possible to define a date format. For CSV files this is necessary if you want to import dates. For Excel files this is generally not needed. However, sometimes a date in Excel is not stored as a date but as text. In this case, the date format will be used to interpret the date. In the date format “y” stands for year, “m” stands for month and “d” stands for day. If, for example, your column is filled with dates that look like 31-07-2013, then you should use the date format “dd-mm-yyyy”. That is: twee positions for day, followed by two positions for month, followed by four positions for year. All fieds are separated by a “-” character in this case.
For CSV files you can also specify the field separator and the decimal separator. Warning! We recommended that you use different characters for the field separator and the decimal separator.
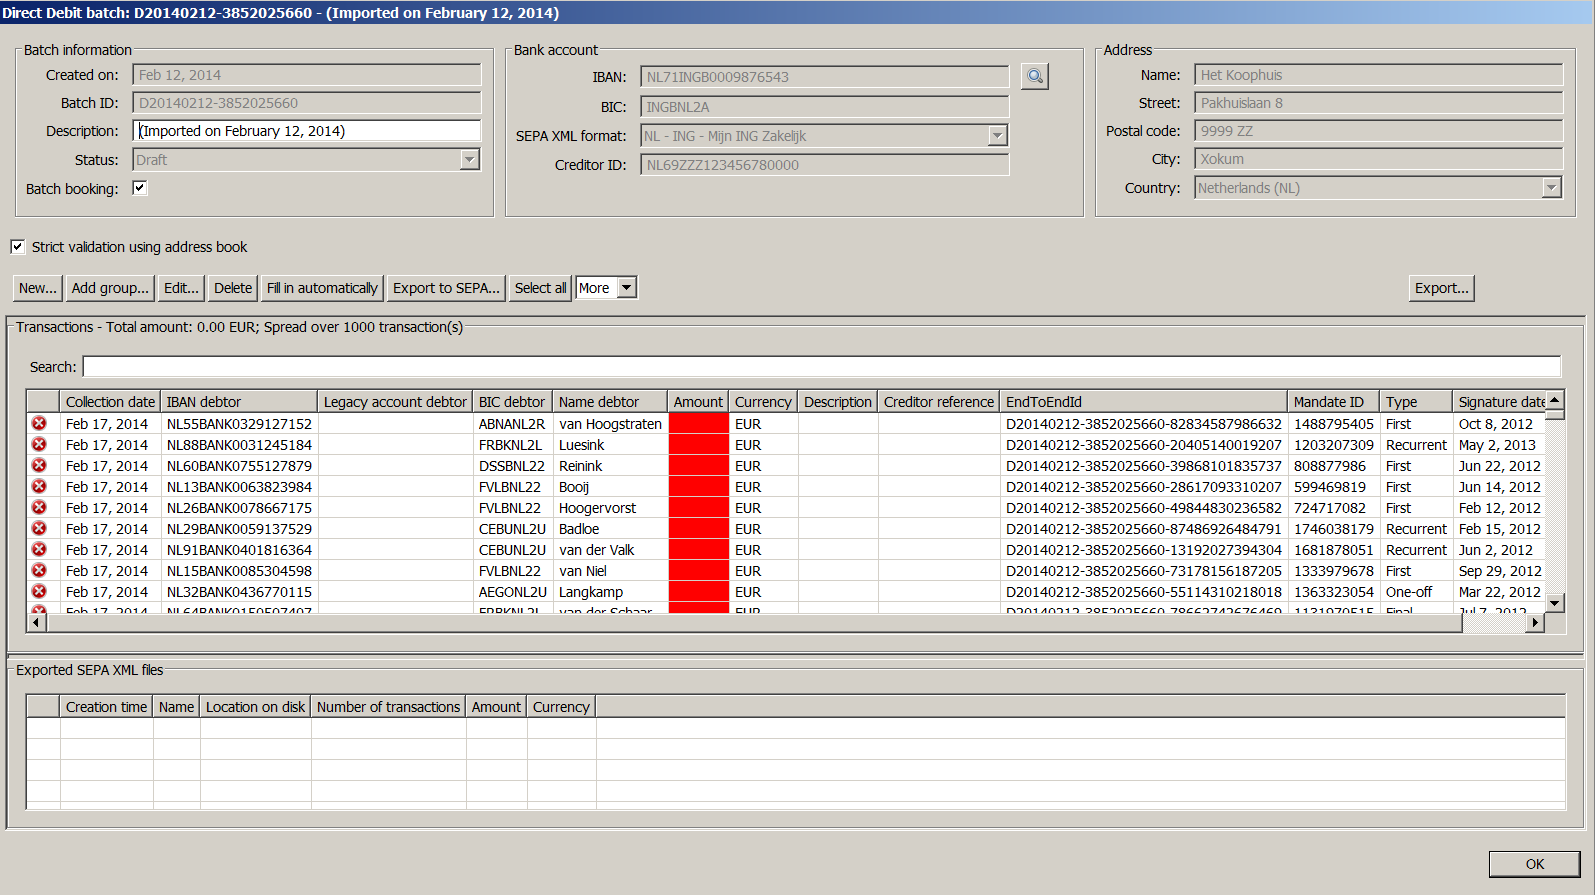
If you have linked the columns that you want to import, then you can save the profile. Type the name you want to use in the field next to “Name” and click “Save profile”. Click “Ok” to import the file. Open the imported batch by selecting it and click “Edit”. The imported batch is now open (Figure 21).
You can see that these transactions are not complete yet. For every transaction the amount is still missing. Open the first transaction, enter an amount and close the transaction by clicking “Ok”. You can use the amount you just filled in for all other transactions by right clicking the amount that you have just filled in. A menu will appear with the option “Use value in whole column”. Select this option to use the value in all transactions. You can also copy the amount to a subset of transactions by using the filter. Only the transactions that are in the list will be changed.
If all amounts are filled in correctly, the transactions are complete (in this example). But some addresses may not be available in the address book, or new mandate IDs may be used that are not known in the address book. You can add these easily if you are sure that all transactions are correct by clicking “Select all” and then “Import in adress book” (from the list when clicking “More”).
5.2 Import Transactions from Other Files
From the main window, you can import other formats using the button “Import”. IBANC will recognize known file types. Old formats ofter do not contain IBAN and BIC information. By selecting all transactions and using the action “Copy from address book” you can fill in this missing information. In order for this to work, you must have entered both the legacy account, IBAN and BIC for these accounts. For more information about conversion of legacy accounts, please read Section 4.
5.3 Add Groups
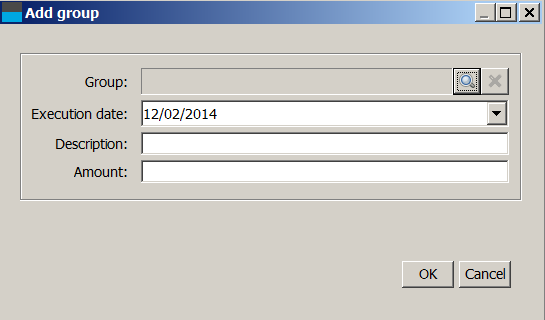
Another possibility to add transactions is by adding entire groups. For more information about group management, please read Section 4.5. A group contains a list of bank accounts (which may be part of a group multiple times) with optionally default values for the amount and description (creditor reference is also possible, but we strongly discourage its use, unless you know how to work with Currence or ISO creditor references). You can add a group to a batch by clicking “Add group” if you have opened a batch. This will open the window from Figure 22.
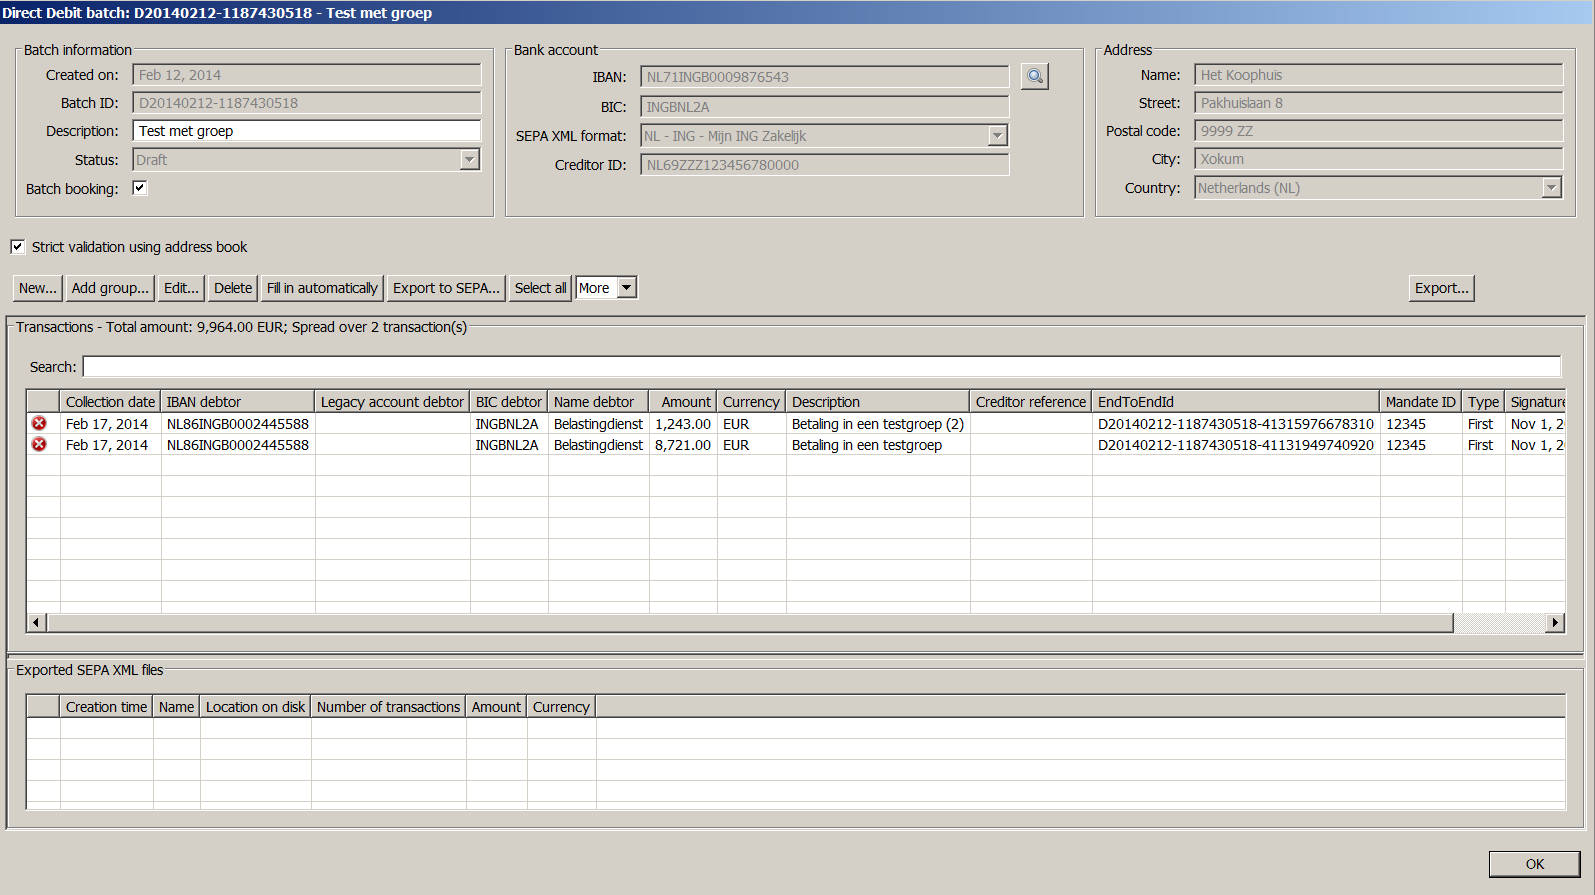
By clicking the looking glass icon you can select a group from the list of all known groups. Select the desired group and click “Ok”. (Figure 23).
Additionally, you can select an execution date that you want to use for this group. If you enter an amount, this amount will be used for the entire group, even if you have defined a different amount for each group member separately. If you leave the amount empty then the values (if filled in) that you have defined for each member will be used.
5.4 Adding Accounts to a Group
You can add accounts to a group when editing a batch directly. To do this, select the transactions you want to use. You can select multiple transactions by keeping the Ctrl button (Apple button on Mac OSX) pressed down. Next, click “Add to group” (part of the button “More”). Select the group you want to add the accounts to. You will be asked if you want to add bank accounts if they are already part of the group. If you select no, only bank accounts that are not in the group currently will be added. If you select yes then bank accounts will always be added to the group, and a bank account may exists multiple times in a single group. You can manage groups from the main window by selecting “Groups” from the “File” menu (See Sectie 4.5).
5.5 Duplicate Batch
From the main screen you can easily duplicate existing batches by selecting them and clicking “Duplicate”. This will create a new batch that contains a copy of the original batch. Of course, the new batch will get a new batch ID and all transactions will get a new end to end ID (unique number for each transaction).
Warning! In the case that you duplicate a batch that contains direct debits with type “First” these will also be of type “First” after duplication. You can easily fix this by selecting all transactions (“Select all”). Next, use “Copy from address book” to get the correct type from the address book. You might need to use “Confirm sequence type” to confirm that the first direct debit has been processed correctly by your bank.
5.6 Export to SEPA XML
If the batch is ready and all transacties have been entered correctly, you can use the button “Export to SEPA” to generate a SEPA XML file for this batch. After successful completion of the export you will get a message that indicates successful completion. After clicking “Ok” you will get the opportunity to save the file to your local disk. This works the same as with other programs, such as a word processor. If you want, you can change the proposed name to something else that may be clearer for you. After you have saved the file, the location of the file will be opened automatically.
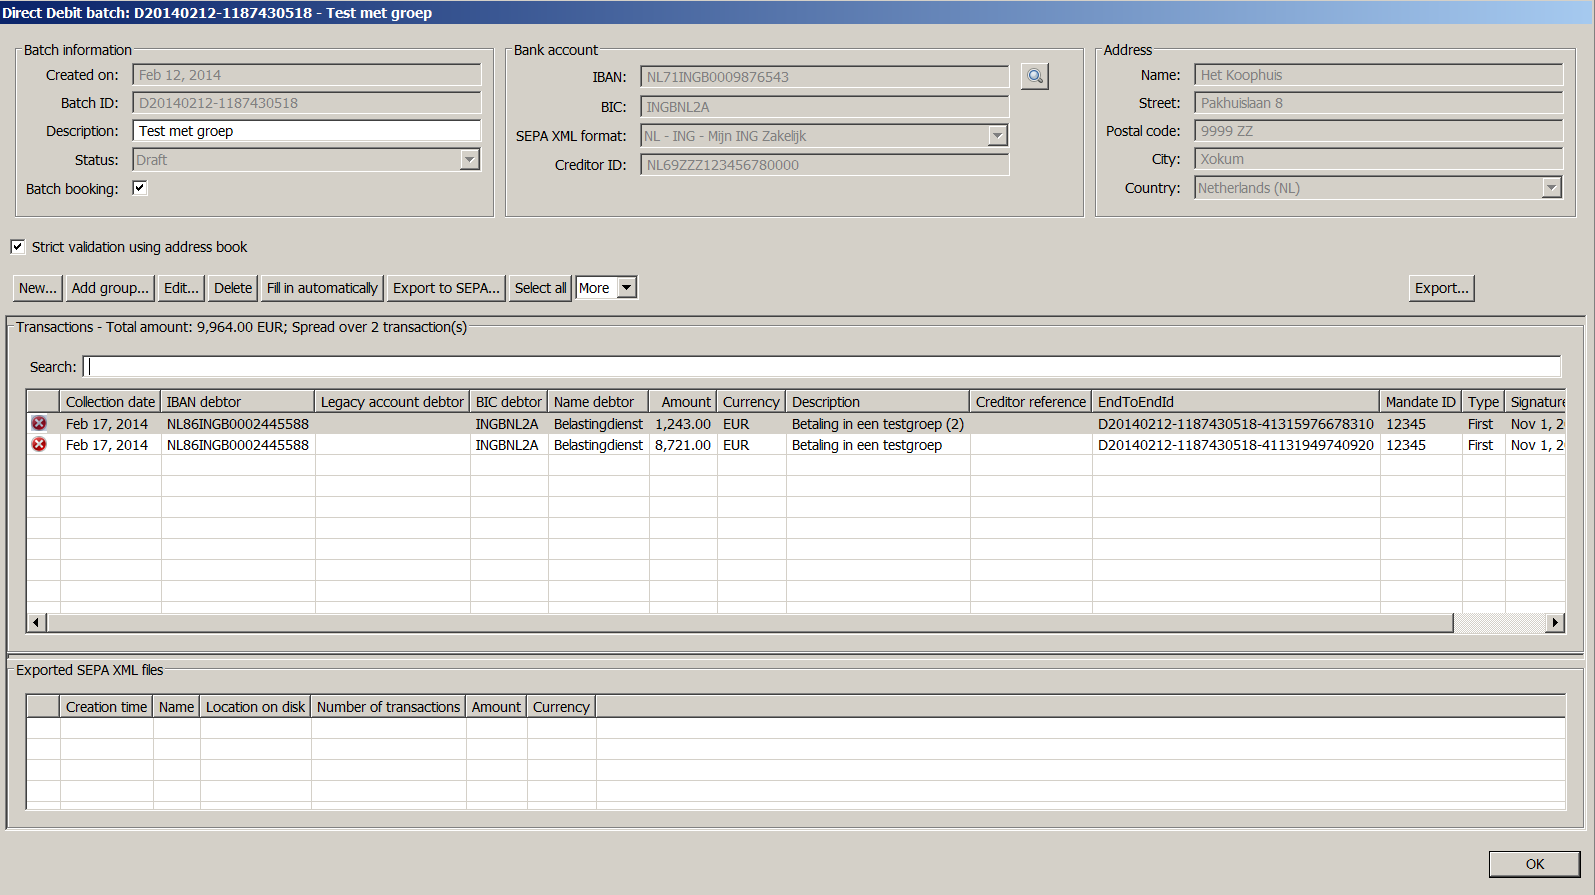
After export to a SEPA XML file, the file will appear in the list of exported SEPA XML files. If you have saved the file to disk, IBANC will show whether this file still exists and if its contents have been changed (Figure 25).
If a cross mark is visible, put the mouse pointer on the cross mark. The cause of the problem will be shown. You can always open the location of the saved fiel by double clicking the file.
Warning! You must send this SEPA XML file to your bank yourself. If you do not know how to do this, please contact your own bank. They can explain you how to do this.
5.7 Generate Mandates Automatically
You can generate mandates automatically for transactions where the mandate ID is absent. Warning! Alwayws try to add existing mandates by selecting transactions and use “Copy from addressbook”.
If you generate mandates automatically these mandates will get 1 November 2009 as signature date. This is the date that you should use for direct debit mandates that you used before you used SEPA direct debit. The mandate ID that is generated is a random, unique number.
You can import mandates in the address book easily (See Sectie 4.4). You can import the signature date from an Excel or CSV file. Of course, you can also create mandates by hand in IBANC.
5.8 Fill in Automatically
Using the button “Fill in automatically” you can try to fill in as much information as possible automatically. If you use this option, the following operations are executed:
- Find existing mandates that fit the combination creditor/debtor.
- Import information to the address book where needed.
- Copy existing information from the address book.
- Generate mandates if the mandaat ID is absent (use signature date 1 November 2009).
- Optionally: For all mandates that were of type “First” previously, confirm that all transactions have been processed succesfully.
5.9 Export
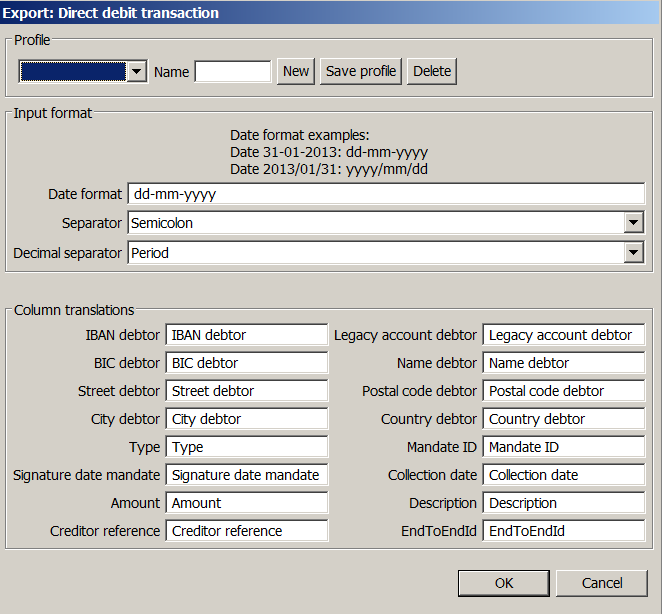
You can export batches to an Excel or CSV file. Use the button “Export...”. You will be asked to create an import profile. (Figure 26).
You can accept the proposed column names, but you can also select an import profile that you use when importing data. Manually changes the column names is also possible. By clicking “Ok” the batch will be exported and you will be asked to select a filename. By default, a file is exported to an Excel (“.xls”) file. If you use a different file extension, the file will be exported as a CSV file.
You can open the exported file with Excel or Libre/OpenOffice. These programs can also be used to adapt your files and print them.
5.10 Printing
If you have exported your batch to a SEPA XML file, you can save the batch to a PDF file. This PDF file can be opened by another application and can be printed. A great advantage of a PDF file is that the printed version and the version viewed on your screen is identical. The PDF file contains a summary of the batch. In the Ultimate edition, the checksums are also available (MD5, SHA1 and SHA256). Additionally, the PDF contains a clear overview of all the transactions.
6 Creating Credit Transfer Batches
Creating SEPA credit transfer batches is easy. The procedure is the same as for direct debit batches, but of course you do not have to deal with mandate management. You should use the right part of the main window to create credit transfer batches. For more information how to work with batches, please read Section 5.
7 System Requirements
IBANC software is available for Microsoft Windows, Mac OS X and Linux.
- Minimum system requirements: Microsoft Windows XP SP3 or higher MAC: OSX 10.7.3 or higher Linux: 32/64 bit Ubuntu/Debian/RedHat/CentOS 256MB internal memory 300MB free disk space
- Microsoft Windows XP SP3 or higher
- MAC: OSX 10.7.3 or higher
- Linux: 32/64 bit Ubuntu/Debian/RedHat/CentOS
- 256MB internal memory
- 300MB free disk space
- Aanbevolen systeemeisen: Microsoft Windows XP SP3 or higher MAC: OSX 10.7.3 or higher Linux: 32/64 bit Ubuntu/Debian/RedHat/CentOS 512MB internal memory 512MB free disk space
- Microsoft Windows XP SP3 or higher
- MAC: OSX 10.7.3 or higher
- Linux: 32/64 bit Ubuntu/Debian/RedHat/CentOS
- 512MB internal memory
- 512MB free disk space


